Frequently Asked Questions
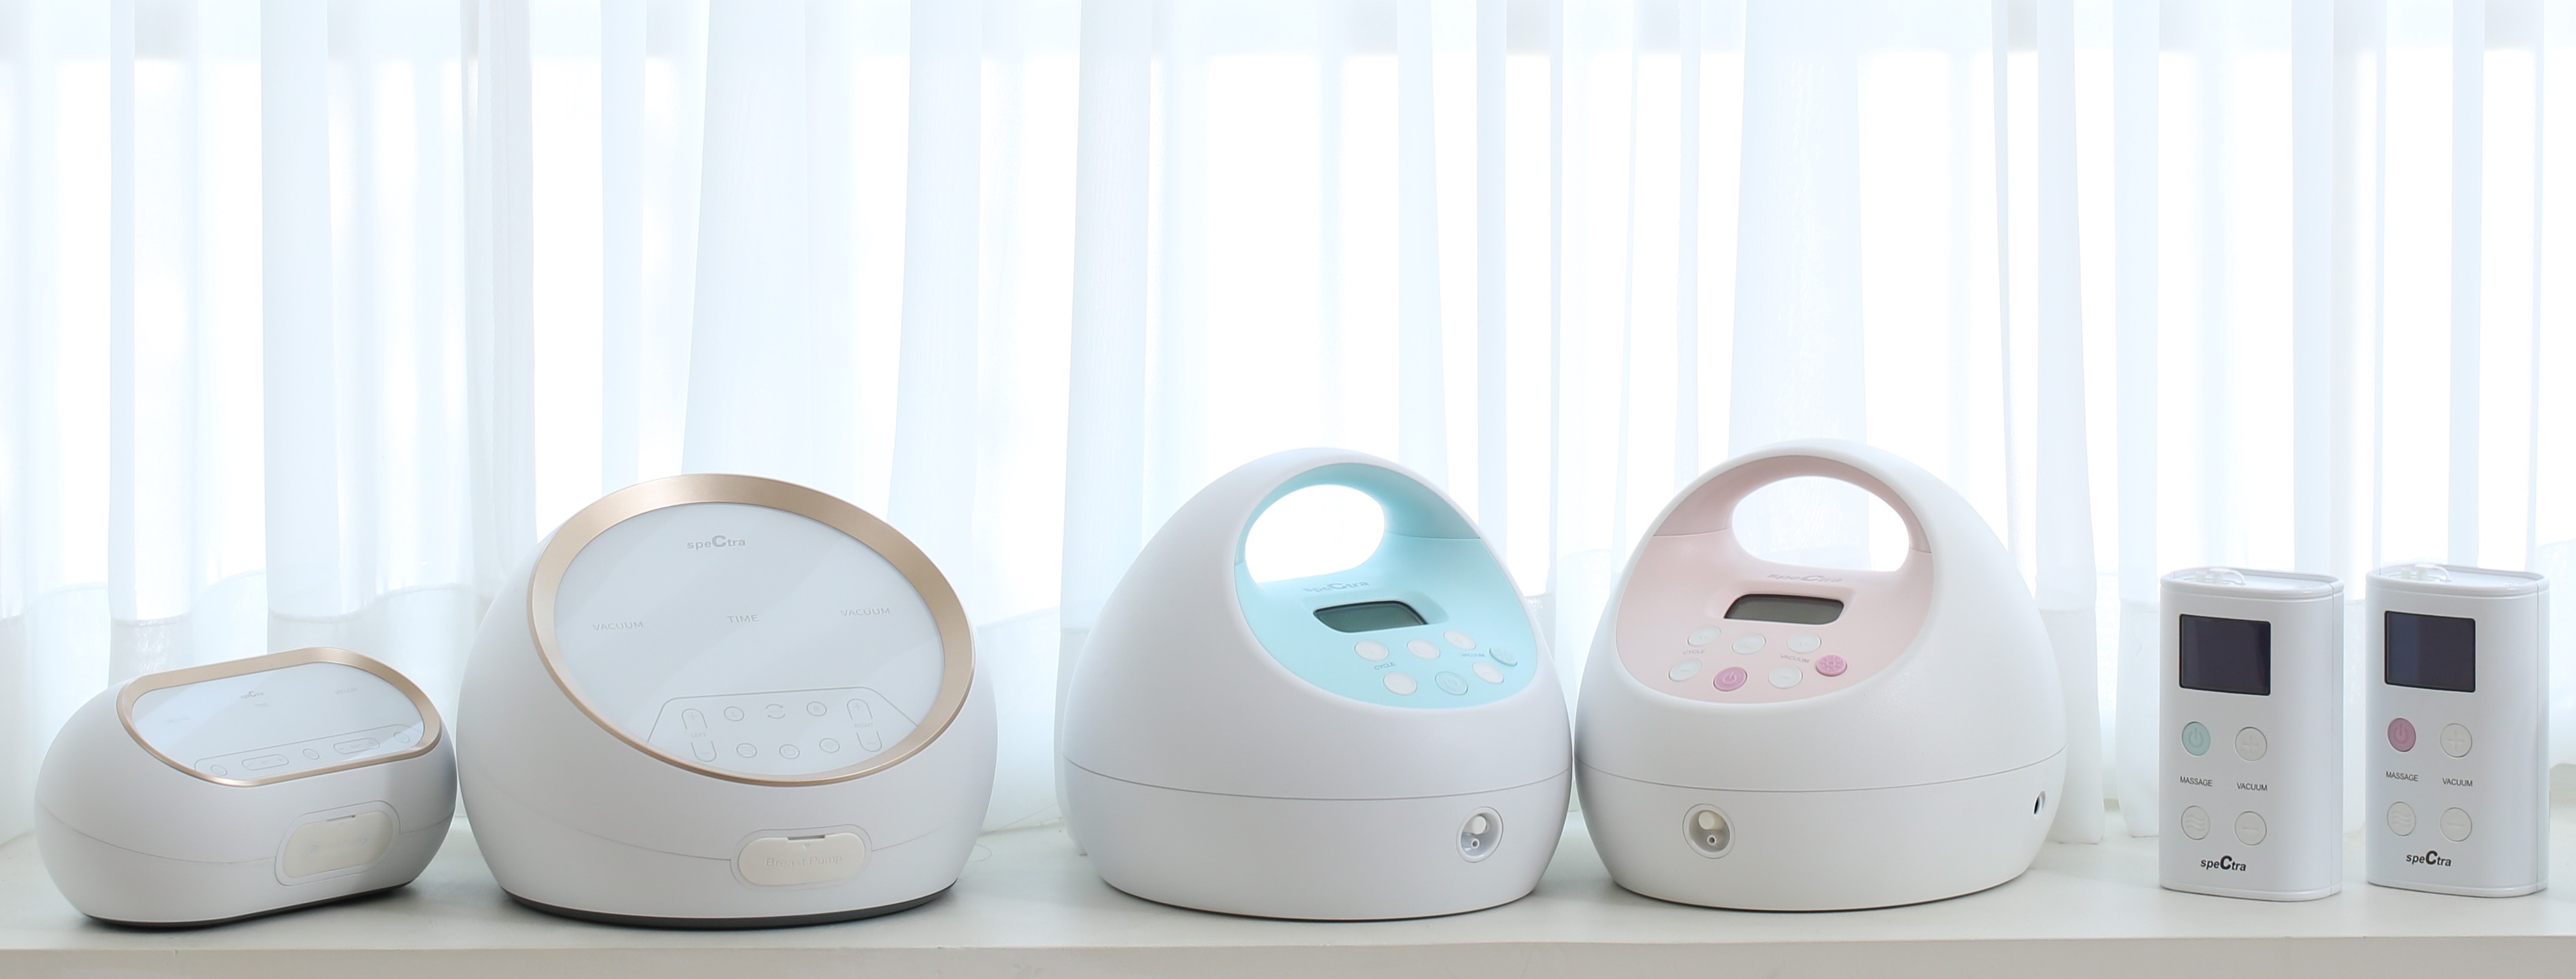
Here at Spectra, we offer multiple pumps that suit different needs. Within our Electric Breast Pump range we have the: Synergy Gold, Gold Dual Compact, S1, S2, S9. We also offer a Manual Pump, for convenient hand pumping, or if you are looking for a backup pump.
All pumping experiences are different, and what you need from a pump will be different compared to another mum. It is about choosing what is best for your routine, and intended purpose.
We have created a comparison chart which you can see below, that highlights the key differences between our electric pumps, and hopefully can help you choose.
Exclusively pumping
We would recommend either the Synergy Gold, Synergy Gold Dual Compact, S1, or S2. These double pumps are strong and durable, something that you will be looking for as an exclusive pumper. They stimulate both breasts to provide maximum output.
Occasionally pumping
If you are just looking to pump for when you are not with your baby, or just need a little bit of flexibility, we would recommend the S9, or the manual pump. For an occasional pumper, you might also find it helpful to pump at the same time as feeding your baby for a better output.
If one breast produces significantly more than the other breast
In this instance we would recommend the Synergy Gold, or the Synergy Gold Dual Compact. These two pumps have two motors, meaning that you can have different settings for both sides. If you struggle getting milk out of one side, you can increase the settings but leave your other side as normal.

The only difference between the S1 and S2 is that, the S1 is a rechargeable pump, therefore making it portable. The S2 needs to be plugged in at all times when in use. The other functionalities and settings are completely the same.
Our Synergy Gold, Synergy Gold Dual Compact, S1, and S2 are Hospital Grade pumps.
Natural Nursing Technology is Spectra’s set of unique features that mimics as closely as possible the experience of natural breastfeeding. From the gentle Massage Mode, to the adjustable suction levels, to the discreet and convenient operation, each unique feature mimics as closely as possible the natural experience of breastfeeding.
Standard on every Spectra model, a closed-system electric breast pump collects milk in a completely secured environment, free from contact with outside contaminates. This keeps the small tubing that leads to the pump’s motor 100% clean, protecting your pump, your milk, and your baby from harmful bacteria.
All Spectra pumps are supplied with 2 x 28mm expression sets (this includes 2 x 28mm breast shields, 2 x bottles, 2 x valves, 2 x backflow protectors and 2 x tubings). Different size Spectra breast shields are available to purchase here.
Having the correct fitting shield is vital for occasional or exclusive pumpers to ensure your milk is being effectively expressed, and also to avoid nipple damage or complications.
Your breast shield size has nothing to do with your breast size, it is the size of your nipples that will determine your shield size.
To find the correct size, measure the width of your nipple (click here to print out our measuring tool). If you measure your nipple diameter before pumping, you need to add 3-5mm and then select the nearest shield size to that. If you measure after pumping you only need to add 1-2mm.
We also offer a silicone, nipple measuring tool which you can purchase here.

A breast shield fits correctly if:
• The nipple is moving freely in the tunnel.
• Little or no dark skin around your nipple is pulled into the tunnel.
• There is a gentle rhythmic motion in the breast with each suction of the pump.
• The breasts drain all over.
A breast shield is not the correct size if:
• Your nipple is injured or traumatised (meaning it’s red, sore, cracked or white at the top after a pump session).
• Your nipple rubs or feels squished inside the shield tunnel.
• If your breasts are not effectively drained all over -too big or too small shield sizes can lead to an ineffective drainage of the breast, pain or complications.

Spectra offer 20mm, 24mm, 28mm, and 32mm shields.
Additional sizes are available in 15mm, 17mm, 19mm, 21mm, 23mm, 25mm, 27mm, 28mm, 30mm, and 32mm. These are by a brand called Maymom, and they are Spectra compatible.
Don’t worry, it can take a bit of tricking the milk to release. Start with a lower suction setting, as too high suction settings can collapse milk ducts and not drain the breast all over.
You will receive 2 x breast shields, 2 x bottles, 2 x backflow protectors, 2 x valves and 2 x tubing. All Spectra storage containers and parts that come into contact with breast milk are BPA free.
You can watch a video here on how to assemble your expression sets.
Alternatively you can follow the steps below:
1. Attach the tubes onto the ports of your pump: for double pumping, remove cap/plug from the port and attach both tubes; for single pumping, plug one side with cap and attach a tube to the other side.
2. For the backflow protector, assemble by folding the white membrane over the smaller casing and then push the larger and smaller casings of the backflow protector together.
3. You will then attach the backflow protector to the tubing, and attach your breast shield to the backflow protector.
4. Attach your valve to the bottom of the breast shield. Screw the bottle onto the breast shield.
5. After pumping, screw the caps on to the bottles and follow proper milk storage guidelines.
There are various different sterilising methods available (such as UV sterilising, steam sterilising, microwave sterilising etc).
All breast pump accessories can be sterilised, except the tubing. All parts (excluding tubing) are also top rack dishwasher safe. NEVER wash your tubing as it will never come into contact with your breast milk, and if the tubes are wet it will damage the pump.
We would always recommend to follow the guidance from the manufacturer of which method you have chosen, and can also take a look at the NHS sterilising guidance.
If tubing becomes mouldy, discontinue using and replace immediately.
Air-dry all parts completely before reassembling, or dry with a clean cloth.
This can vary depending if you are an exclusively pumping parent or if you pump occasionally. Maintaining your pump and accessories is vital in order to keep your pump working effectively.
If you have been pumping exclusively for a while and notice a change in output without having changed anything in terms of routine or lifestyle, then it is always worth looking at the parts and replacing them - the biggest culprit are normally loose membranes and duckbill valves that wear out easily and cause a loss in suction.
As a rough guideline, we would recommend the following timeline (keep in mind it will vary from person to person):
• Duckbill valves - every 1-3 months.
• Backflow protectors - every 3-6 months.
• Tubing - every 4-6 months or if dirty.
• Breast shields - every 6 months or if damaged.
• Bottles - only if chipped or damaged.
Handy tip: You can take pictures of your pump parts when you started pumping to compare them in a few weeks / months’ time to see if they might need changing.
1. Press the on button, your pump will power-up in expression mode.
2. To put the pump into massage mode, push the three-wave button. Once you’re in massage mode, three wavey lines will appear on your screen. When you are in massage mode, the cycle is set to 70 and you cannot adjust it.
3. Massage mode helps facilitate your let-down. Some mums will get a let-down in 30 seconds, and others will take a couple of minutes. You can massage the breast to help stimulate your let-down as well.
4. You can adjust the suction strength by pressing the up and down buttons, it can adjust from levels 1 to 5. Adjust this based on your comfort level.
5. After you achieve let-down, you will want to press the three-wave button to put it back into expression mode.
6. In expression mode, you will be able to adjust the cycles every minute, up or down, going between 38 and 54 cycles/minute.
7. You can adjust the suction strength from level 1 to 12 which is measured in mmHg: level 12 will reach 250mmHg. Adjust this to your comfort level.
8. The S2/S1 will remember your settings automatically for your next session.
9. If you want to start pumping on different settings to those that you finished with in your previous session, adjust the settings before you start expressing.
10. Some mums can get multiple let-downs, so going back and forth is recommended if needed.
11. The pump will automatically shut off after 30 minutes of pumping time for safety purposes.
Getting started can feel overwhelming, but let’s try and make this as comfortable and convenient as possible for you. Pumping is primarily about how comfortable and relaxed you are, so the first step is always finding a nice spot that you feel comfortable in. This can be a nursing chair, a bed, a sofa, or wherever you feel most relaxed.
Get comfortable and make sure you bring all the right things that make you happy whilst you are pumping, this can be a warm or cold drink, your phone, a book, or anything you would like to do whilst you are pumping. Many pumping parents find it helpful to watch something or listen to something so they do not hyper focus on pumping alone. You can also have a cuddle with baby or feed baby on the other side.
- When you first get started make sure all settings are low at first and then work your way up.
- Observing your nipple and paying attention to how the pump feels will help to make sure there is no damage to the nipple or any complications that are developing.
- A pumping session is only 10-15 minutes or when the milk flow has actively slowed down. Doing more frequent sessions that are short has proven to be more effective in milk output than pumping for long durations and not frequently enough.
- Once you have done 10-15 minutes you can store the milk and also wash the pump parts for next time.
All of the Spectra pumps have a variety of settings to mimic different suck patterns and to effectively drain the breast. Most of the Spectra pumps have pre- settings that will mimic baby’s sucking behaviour whilst others give you the opportunity to programme your own settings.
A breastfed baby normally starts off with high frequency sucks to stimulate the breast and release the hormones that will cause milk release (also known as let-down) - so if you are not using pre-settings but are experimenting with your own adjustments we recommend starting with a high frequency setting but low suction.
Once let down occurs babies go into strong sucks with a slower, gulping rhythm - to mimic this you could try and do a lower frequency but a stronger sucking motion. Here we also recommend using the massage feature our Spectra pumps offer to create an even more comparable pumping experience.
Like this you can mimic breastfeeding behaviours which may give you a quicker let down and higher milk output whilst pumping.
A pumping routine can be what you need it to be. As long as it is a repeating pattern, your breasts can anticipate such routine and then have an efficient milk supply.
Milk supply works on demand and supply so as long as there is a steady demand you can increase and decrease your pumping output by setting routines that work for you.
Please keep in mind, that after birth you produce colostrum. Colostrum is very sticky and will get stuck in the parts of your pump, if your intention is to pump right after birth you may need to utilise hand expression techniques as well as the pump to offer colostrum to baby.
Exclusively:
You can start a pump routine as soon as baby is born, if the pump can’t be used to catch colostrum then hand express in between.
For an exclusive pumping routine we recommend to pump every 2-3 hrs day AND night.
Occasional:
You can start using a pump when your milk has transitioned (day 3-5 postpartum).
For occasional top ups or involvements of partners/relatives pump 1x per day or every other day.
For the best output goals pump whilst feeding baby on the other side.
Unfortunately sometimes pumps can also cause nipple damage and pain, the most crucial step will be to review the fit of the shield and start with a setting that is more gentle and slowly work on finding a comfortable fit and setting are so they cause no further damage. If your nipples are too sore to pump you can also try hand expression for a bit and heal your nipples with moist wound healing. This method uses your own breastmilk to heal the damage by using silver cups that you wear over your nipples.
If your shield is ill fitted, it is just like an incorrect latch on the breast, which can cause complications. Two of the most common complications are blocked ducts and mastitis, where the breast is inefficiently drained. Please review the shield fit and massage and feel your breast after pumping to ensure your breast is stimulated all over. Please also see in depth articles on blocked ducts and mastitis.
Sometimes when you pump you may see your milk is pink or even red. Don’t worry, breastmilk can have almost all the colours of the rainbow and none of which are a great cause for concern. Red milk can be an indication of blood in the milk which can come from nipple damage. It is important to make sure that you review your shield fit and pump setting to ensure that your nipple isn’t damaged when pumping.
Don’t worry, the amount you pump does not indicate the overall milk supply capacity. In this case it is recommended to review the shield fit and size as well as pump settings you are pumping with. Should this not resolve it then it is important to work with your suction level, increasing your oxytocin levels can involve massage, warm applications, relaxation, hands on pumping and also changing your pumping routine.
In the breastfeeding community this is lovingly referred to as “slacker” boob where one breast has a noticeably larger output than the other. This is not an indication of a problem at all. It’s normal for one breast to produce more than the other side, and there is nothing you need to do to change it. You can pump this side more if you prefer but it is not a necessity.
Some may think that pumping will help determine milk production and overall supply as you may be able to visibly see your output.
This, however, is not the truth for many. Most pumping parents have high expectations towards their pumping output and whilst there are always effective methods to increase your pumping output, it is absolutely crucial to remember…
What you pump is what you CAN pump at this moment in time NOT your overall pump capability!
Although many pumps have incredible settings that mimic closely the suction pattern and strength of a baby there are just significant differences compared to nursing on the breast/chest. These differences will then influence how milk is being released NOT produced.
For example:
· A nursing baby will do nipple stimulation by using their hands, lips and even tongue before latching on.
· Their body as well as mouth is providing warmth to your breast/chest.
· Their voices /cries may trigger a milk let down before latching.
· Suction and latching mechanisms do deviate slightly compared to a pump.
· Nursing on demand provides unlimited stimulation and increase in supply.
· All of the above are facts and are all influencing factors as to how much milk is being produced, but most importantly how smoothly this milk is being released.
· Pumping is 20% correct fit and settings, and 80% mind frame, technique and extra stimulation.
· As a shield goes onto your breast/chest there are various differences that your body will pick up immediately. All can be helped by utilising pumping tips below, however, they all influence how much milk can be released.
A pump (on its own) does NOT:
· Do nipple stimulation before a pumping session.
· Provide warmth.
· Provide a soothing noise or cry (in fact the pumping noise for some can lead to extra stress and negative association).
· Mimic a baby’s mouth fully.
· Have a demand routine (unless strictly implemented with power pumping and more).
· Most pumps also do not have a massage function to utilise for a more natural pumping experience, however, at Spectra ALL of our pumps have a brilliant massage function that can help provide further stimulation.
· When you pump you may have a slower release of milk. This does not mean you don’t make enough milk, in fact you are producing milk if you have a good pumping routine, BUT the release of this milk needs to sometimes be tricked to mimic nursing on the breast closer.
· Warm applications, massage, nipple stimulation - A little hand expression, and if you can, 15-30 minutes of skin to skin contact with baby before a pump. All of these increase pumping output and stimulate let down. All of the Spectra pump models give the option to choose a massage setting before and during a pump session.
· Body conditioning - Our bodies are designed to react to reoccurring things, pumping in the same place, with the same smell, music, drink or food, will help your let down.
· Playing a video of baby crying - This gives a quicker let down then watching a happy cute video. Sounds cruel but nature has designed your breasts to lactate to the sound of a crying baby, because milk dries baby tears. Using the pump whilst massaging and hand-expressing as well as the noise of the pump can trigger a quicker let down.
· Relaxation and visualisation - Making sure that you are in the most relaxed state is key to a good milk output, having some relaxing music on or even a guided meditation makes all the difference in your milk flow.
· Frequency over length- The more frequently you empty your breasts the more milk you will produce. Example being that if you pump 5x a day for 20 minutes compared to 8 times for 10 minutes , the later will show a larger milk output.
· Lactation is a hugely hormonal process and therefore it comes with no surprise that we need to utilise the stimulation of these hormones correctly.
· Oxytocin is the main hormone responsible for the milk ejection reflex also called let down (the trigger that released the flow of milk into baby’s mouth or the pump).
· Oxytocin can be simulated with the tips above and therefore it can increase your pumping output as we have a smoother let down.
· One inhibiting factor to oxytocin is stress! Stress can have various causes such as, illness, emotional or physical stress and also stressing over your output when pumping. This can actually make your milk output less.
· Therefore looking after yourself, taking up self-care routines, having a massage, skin to skin contact with baby, or cuddles with your partner can all help additionally seeing a better pumping output.
· In summary, pumping takes practice and sometimes we need to create similarities to get a better output. However, not seeing a pumping output does absolutely not indicate a lack of supply or milk.
Any pumping mother can benefit from this. For breastfeeding mothers looking to boost their supply it may be important to discuss milk supply concerns first to see if this is needed. In many cases, milk supply worry behaviours are completely normal breastfeeding baby behaviour.
The principle is to mimic the frequent feeding behaviours of baby during a cluster feed or a growth spurt to ultimately produce more milk.
Here are the basics:
Using a power pump session you are telling your body that more milk is needed. The following sequence is what works but you can find your own timings and figure out what works best for you.
1. Pump for 20 minutes both sides.
2. Rest 10 minutes.
3. Pump another 10 minutes.
4. Rest for 10 minutes.
5. Pump again for 10 minutes.
6. Finish.
General rule of thumb is that you pump for roughly 40-50 minutes in an hour period. This will signal your body that there is more demand and your body will answer in producing more milk. It is very important to know that your body won’t be producing this milk straight away, most mamas see result in the pumping output in 24-48hrs after they did a power pumping session.
So whilst you are power pumping you may see very little milk flow as this session is to stimulate your breast and to ultimately signal to your body that more milk is needed in the future not only for this power pump session (so don’t get confused if the output remains the same).
Power pumping can be done at any point during the day that works for you. It should be repeated 2-3 days in a row so that your body gets the message that milk production needs to be increased and you should see results a few days after you completed your power pump days.
A power pump session needs to be added to your normal pumping routine. Do not replace a pumping session, the key is to add more pumps.
For breastfeeding mums that are looking to offer top ups to their baby, power pumping will be great.
During the break of your pumping session, you can also apply a warm compression and massage your breast gently to get the right hormones flowing.
The settings and functionality are exactly the same, it is just displayed differently now. This should help:
New Display will show:
Expression Mode: 38~54 cycles per minute
Level C1: 38
Level C2 : 42
Level C3: 46
Level C4: 50
Level C5: 54
Massage Mode: 70~105 cycles per minute (A wave (~)symbol can be seen on the display)
Level C1: 70
Level C2 : 80
Level C3: 90
Level C4: 100
Level C5: 105
Please try the following steps:
1. Unplug the power cord from the pump. Now your power cord separates into two pieces.
2. You will want to remove the detachable prongs from the end that plugs into the wall.
3. You should now have the pump, power cord, and prong adapter separated into three pieces. Reattach the prong piece, sliding it on to the end of your power cord pushing it down as hard as you can. You want to push it all the way down until you hear a loud snap.
4. Plug your power cord into your pump, pushing it into the port until you hear it click.
5. Then, plug your pump into a working outlet—try a second outlet in your house that you know is working.
6. Hold the power button for 30 seconds and let go. Give it 15 seconds and see if your pump now turns on.
Please try the following steps:
1. Unplug the power cord from the pump. Now your power cord separates into two pieces.
2. You will want to remove the detachable prongs from the end that plugs into the wall.
3. You should now have the pump, power cord, and prong adapter separated into three pieces. Reattach the prong piece, sliding it on to the end of your power cord pushing it down as hard as you can. You want to push it all the way down until you hear a loud snap.
4. Plug your power cord into your pump, pushing it into the port until you hear it click. Then, plug your pump into a working outlet—try a second outlet in your house that you know is working. You should now see a battery symbol on your pump.
5. Hold the power button for 30 seconds and let go. Give it 15 seconds and see if your pump now turns on. If it is charging the battery symbol should go away on the screen when plugged in.
Please try these steps:
1. Make sure your white duckbill valves are attached and pushed fully up at the bottom of your breast shield where the bottle screws on. Also check your duckbill valve for tears. Make sure the opening at the end is closed when not in use. If you need to replace your valves (we recommend every 3-4 months) you can find them here.
2. If you are single pumping, make sure your air cap is pushed fully on.
3. Are your breast shields the right size? Check your tubing to see if there are any holes in the tubing.
4. Attach the tubing to the base of your pump and feel the suction. Is it too strong?
5. If you are getting a strong suction we know that the pump motor is working well. It will be one of your accessories that will be the culprit.
6. If you add your backflow protector, is the membrane moving? Are the movements soft or strong?
7. If all is working well there, attach the breast shield. Check if you are having the same issue on both sides.
8. Do you single pump? Try swapping out your parts from one port to the other- does this change which side was not working if only one was the issue?
9. Have you tried increasing the suction and cycle level?
10. What is your wash routine like? Are you only hand washing all your parts and never washing or doing anything to the tubing?
11. Are you using only our parts? Have you replaced your parts within the last 3 months from our website?
12. If you have further questions, please visit the contact page and we can assist you.
If you have finished your pumping journey, and are wondering what to do with your Spectra pump, you can send it back to us for recycling! Please only send back your main pump unit, as you can recycle some of your accessories in your regular household bins.
Parts you can recycle at home:
The Spectra hard plastic accessories (breastshields, bottles, bottle caps, sealing discs, backflow protector casing) can be recycled in your regular household bin.
Parts that need to be thrown away:
The Spectra soft silicone accessories (tubing, duckbill valves, backflow protector membrane, teats), unfortunately cannot be recycled, and need to be thrown away.
Breast pump unit:
To send your pump back to us for recycling, contact our customer care team who will happily provide you with a pre-paid returns label for your pump.